Just a reminder to be courteous to ski patrollers, follow the rules, and park by the church when going to skin uphill at Brighton. Please read the following link!:
http://jasondorais.blogspot.com/2013/12/uphill-skiing-policy-at-brighton.html
Thanks! Enjoy the new snow.

Tuesday, December 10, 2013
Sunday, December 1, 2013
Utah Skimo Citizen Series Race #1 - Skin the Turkey
I don't have time to do a full race report, so here are some links to some other blogs with pictures and videos of the first Citizen Series race of the season. There will be a total of 11 races throughout the year and they are a blast!
http://jasondorais.blogspot.com/2013/12/wasatch-citizen-series-video.html
http://www.slcsherpa.blogspot.com/2013/12/wasatch-skimo-citizens-race-1-skin.html
http://tetonsandwasatch.com/2013/citizen-series-race-1-pictorial-underground-anymore/
There were record crowds on Thanksgiving morning. Nearly 100 people! The Wasatch already has one of the strongest communities for Skimo in the country and it is growing quickly.
If you've never been out to these races, definitely come join in the fun. The races are free (donations are great to help pay for insurance, but not required), there's always a lot of swag given away after the race, and it's a good excuse to get into the mountain for some exercise in the middle of a busy work week.
To join Utahskimo, go to Utahskimo.org and click "register." It's a $30 fee which will get you a year membership, get you into each race for free (what a deal! 11 free races for FREE!), give you a 15% discount on all backcountry skiing and snowboarding and mountaineering equipment at GEAR:30, and, most importantly, it helps pay for insurance for the Citizen Series races and allows the Skimo scene in Utah to continue to grow.
For a calendar of all the Citizen Series Races, click here. A few more races will be added shortly.
Friday, October 25, 2013
Bear 100 Interview
I've been meaning to post my race report from the Bear 100 Endurance Race to the blog, but I got half way done with it and haven't found the time to finish it off. I did a little interview for a GEAR:30 Radio Podcast which, for the most part, covers my experience. I still plan to finish and post my race report, but until then, here is a link to the interview:
http://www.gearthirty.com/blog/2013/10/04/ogden-outdoor-adventure-show-episode-144-the-shutdown/
When you go to the link, the podcast that is on the page is called "The Swap" and is not my interview. It's supposed to be but there's something funky going on there. You have to click the lines in the upper righthand corner and then click on "Greg Reynolds-Bear 100 Interview".
For more information about the Bear 100, here is a link to the race website:
http://www.bear100.com
Also, for some other race reports about the same race (from people much faster than I am), check out these links:
http://slippingslowlyintopain.blogspot.com/2013/09/2013-bear-100-happy-to-be-member-of.html
http://www.slcsherpa.blogspot.com/2013/10/the-2013-bear-100.html
Saturday, August 24, 2013
A Couple Pictures from Summer Adventures
"The road to hell is paved with good intentions." Doesn't bode real well for me.


I have had the best intentions to start posting regularly on the blog again. I have failed miserably. I have about 20 half-finished blog articles that have yet to be posted and I just haven't had time to finish any of them.
Well, I have about 20 minutes tonight, so I thought I would simply post some pictures from some of my more recent adventures. I am hoping that longer trip reports, gear reviews, etc. will follow, but I am not making any promises.
This was during our Grand Traverse in a day attempt in July. I was not fit enough to complete the route in a day, but we were able to do the Cathedral Traverse in decent time. Here I am on top of Teewinot with Owen and the Grand in the background.
Here I'm standing on top of Mt. Owen. If I look a little fat in this picture that's because I am.
Daniel, my climbing partner, is a much stronger climber than I am. He quickly and effortlessly ran up Owen. When I was at the final move to get to the summit, I got a little sketched by the exposure. He dropped me a rope just in case. I wouldn't have hesitated to pull the move in the past. It's funny how a family changes one's perspectives. I consider that a good thing.
Heading over to Gunsight Notch. Daniel is in this picture. Daniel is the director of the Weber State University Outdoor Program. He runs an awesome program for students and the community. About the nicest and most talented guy you'll ever meet, too. It was fun to spend this time with him.
Daniel on top of the Grand. We had intended to head up the Italian Cracks variation on the North Face of the Grand. We ended up climbing the North Ridge. The chimneys on the North Ridge were wet and tiring. Daniel led and was psyched on the climbing even though we would have rather climbed the Italian Cracks. I was less enthusiastic about the route and was wondering how it was ever considered a classic. Now that I've forgotten how tired I was and how wet the chimneys were, I think I like the route. Probably wouldn't intentionally climbing it again. I'm excited to do the Italian Cracks though.
We headed down to the Lower Saddle and bivied for the night. I was moving too slowly by that point to finish off the route in a day. We decided to just run up the Middle Teton the next morning and head back home to family festivities.
Myself on top of the Middle Teton with the Grand in the background.
The next adventure worth sharing was a recent trip to the Cirque of the Towers with my family. Because my wife was carrying our little boy, I got to carry my stuff, her stuff, Lincoln's stuff, and climbing gear. I'm just not that tough of a person and this pack just about did me in.
70lbs is more than I've carried in a long time and more than I ever want to carry again.
Kelsey, Lincoln, and I on our way up over Jackass Pass.
The view of the Cirque of the Towers from Jackass Pass. A few friends of mine just happened to be going to the Cirque the same days that I was going to be there with my family. In spite of the fact that this was supposed to be a family backpacking trip, my wife gave me permission to climb with them for part of a day. We headed up and did the East Ridge of Wolf's Head.
Heading up over Tiger's Tower between Pingora and Wolf's Head. In the foreground is Joe Keeler and Ryan Thompson is in the background.
Myself, Wes, and Joe and we approach Wolf's Head.
Joe and I and the beginning of the Piton Pitch, enjoying the view of Bollinger Peak in the background. Joe was really fun to climb with. He has such a positive attitude and a lot of enthusiasm. He's also a good climber. The other two, Wes and Ryan, and great to climb with too, but Joe and I got to rope up together on this particular climb.
Wes, Joe, Ryan, and I enjoying the view on top of Wolf's Head. It was an easy route to climb, but the beautiful views and great exposure made this a definite classic.
The view on the descent from Wolf's Head.
Kelsey and Lincoln going to sleep. Lincoln is a great hiker. He happily rides in the backpack all day. Sleeping is another story. We're still trying to figure that one out. This picture was taken before Kelsey went to sleep. She looks much less happy in the morning after a night with little sleep.
The Cirque of the Towers has to be one of the most beautiful places in the lower 48 states. Every time I'm there I'm surprised by its beauty. I will post a lot more pictures of this trip that were taken on my father-in-law's DSLR as soon as we exchange pictures. They were absolutely spectacular.
Friday, July 19, 2013
My Summer in a Nutshell and Upcoming Posts. . .
So, I have done a horrible job over the last 6 months or so keeping up on the blog. The combination of a new business, a new baby, a new (old, but new to us) house we're remodeling a little bit, and wanting to spend all my free time with the family or in the mountains, I have all but forgotten about the blog.
Anyway, I wanted to briefly recap some of my summer events and mention a few posts that are coming down the pike.
So, I started out my spring and summer with the goal of running a 100 mile trail race in September and doing the Grand Traverse at the beginning of July. This means that my free time has been spent doing local trail runs and bagging local peaks. I have been averaging (up until a few weeks ago, anyway) about 60 miles and about 15-20k vert per week. It's been fun to see the improvement in my cardio and ability to hike steep hills without getting winded or legs getting tired. I hope that fitness translates on the skimo gear and with mountain boots on.


A few weeks ago a friend of mine and I headed to the Tetons to try our hand at the Grand Traverse in a day. Well, we didn't get the Grand Traverse done, but we did the Cathedral Traverse in a day and headed up the Middle Teton the next day before heading home. It was a great trip and learning experience, but I am definitely eager to get back there and try to finish the traverse. A longer post with pictures is in the works.
A couple days after the Tetons I took my wife and little boy backpacking, along with some other family, up a local peak to celebrate Independence Day and watch the fireworks from above. Our little boy is quite the little outdoorsman. He is happiest when he is sitting in his backpack hiking around and he sleeps better in a tent than he does at home. It was a fun trip. We're looking forward to some longer outings later this summer.


A have had the opportunity to test out the Aarn Guiding Light backpack, a Stephenson Warmlite Triple Bag, the Marmot Speedri Jacket, and a few other pieces of gear over the last year or so. Those reviews are in the works and will hopefully be posted soon.
I am going to try to post about one or two times per week. Hopefully that's doable.
Anyway, I wanted to briefly recap some of my summer events and mention a few posts that are coming down the pike.
So, I started out my spring and summer with the goal of running a 100 mile trail race in September and doing the Grand Traverse at the beginning of July. This means that my free time has been spent doing local trail runs and bagging local peaks. I have been averaging (up until a few weeks ago, anyway) about 60 miles and about 15-20k vert per week. It's been fun to see the improvement in my cardio and ability to hike steep hills without getting winded or legs getting tired. I hope that fitness translates on the skimo gear and with mountain boots on.

On the ridge just below Mt. Ogden

On Malan's Peak, on the way down from Mt. Ogden.

Looking north along the ridge toward Ben Lomond.

Heading back down from Ben Lomond looking south.
A few weeks ago a friend of mine and I headed to the Tetons to try our hand at the Grand Traverse in a day. Well, we didn't get the Grand Traverse done, but we did the Cathedral Traverse in a day and headed up the Middle Teton the next day before heading home. It was a great trip and learning experience, but I am definitely eager to get back there and try to finish the traverse. A longer post with pictures is in the works.
A couple days after the Tetons I took my wife and little boy backpacking, along with some other family, up a local peak to celebrate Independence Day and watch the fireworks from above. Our little boy is quite the little outdoorsman. He is happiest when he is sitting in his backpack hiking around and he sleeps better in a tent than he does at home. It was a fun trip. We're looking forward to some longer outings later this summer.

Kelsey, Lincoln, and I right before heading up Ben Lomond. Lincoln sporting his Julbo glasses. Thanks again Kristen for hooking him up!

Lincoln loving the mountains.
A have had the opportunity to test out the Aarn Guiding Light backpack, a Stephenson Warmlite Triple Bag, the Marmot Speedri Jacket, and a few other pieces of gear over the last year or so. Those reviews are in the works and will hopefully be posted soon.
I am going to try to post about one or two times per week. Hopefully that's doable.
Friday, May 17, 2013
Thanks Andy and Jason for the Great Slideshow!
I just want to give a big thanks to the Dorais Bros' for their slideshow last week. They did a great job. We really appreciate them coming out and sharing their experience, pictures, and enthusiasm with the Ogden community.
We'd also like to thank Outdoor Research for their support. They have been an awesome partners to work with and donated some great swag for the event.
If you haven't seen their blogs yet, you're missing out. There are very few blogs that I've found that keep me as excited and motivated to get into the mountains as their blogs do.
Here are the links again:
http://jasondorais.blogspot.com
http://slcsherpa.blogspot.com/
Tuesday, April 30, 2013
Dorais Brothers' Slideshow - Tuesday, May 7 at 7pm
GEAR:30 and Outdoor Research are proud to present The Dorais Brothers' Slideshow, "Mountain Endurance: Red-lining in the Wasatch."
GEAR:30 came up with the title and flyer. The humble guys that the Dorais Bros are, they thought the flyer sounded a bit exaggerated. For those of us that follow their blogs, we understand that it's accurate.
Anyway, come join us!

GEAR:30 came up with the title and flyer. The humble guys that the Dorais Bros are, they thought the flyer sounded a bit exaggerated. For those of us that follow their blogs, we understand that it's accurate.
Anyway, come join us!
Here's a link to their blogs:
My Thoughts on this year's Piolets d'Or 2013 Winners
This might be old news. . . it's an old post too that I just didn't get around to finishing and publishing.
Participation trophies were handed out at this year's Piolets d'Or, thereby making the award, well, much less valuable.
http://www.alpinist.com/doc/web13s/newswire-piolets-d-or-2013?utm_source=feedburner&utm_medium=feed&utm_campaign=Feed%3A+alpinist%2FEFcn+%28Alpinist+Newswires%29
Now, I have been a fan of the Piolets d'Or award for years. I felt like it was a good way to recognize people who have accomplished incredible things in the mountains. It has encouraged climbers to push their own limits and the limits of the sport. It has encouraged climbers to expand their vision of what is possible. It has now become a participation trophy.
I'm sure my opinion means little to most people, especially to those that are involved in choosing the Piolet d'Or winners, but that's the nice thing about blogs; if you don't want to hear it, don't read it.
In the article on Alpinist, it is stated that the Piolet d'Or has adopted a non-competitive, "everybody wins" approach to climbing, discouraging competition in the sport. Marko Prezelj chose not to accept his Piolet d'Or a few years ago because he said something about not liking the rivalry that develops between climbing teams because they are all vying for the coveted award. He said that it encourages drama and winners and losers are judged.
Well, I think it's great that Prezelj has his opinion and that he acted upon his convictions, but I strongly disagree.
If people feel like they've lost because somebody else won, that's a personal pride issue, not an award issue. If somebody feels like an award is causing an unhealthy rivalry among climbing teams, that's a personal problem. It's not the award causing those feelings, that is the climber's pride and ego getting in the way. Pride says, "if you succeed, then I am a failure." I have never once felt that way while climbing with others or hearing about others' successes in the mountains.
One of the greatest things about the climbing community that I belong to (and I thought it was this way everywhere) is that everybody wants everybody to succeed. We all celebrate each others' successes. There's never the feeling of failure when somebody else succeeds.
There is also competition among our community. Recently we had a bouldering competition as part of the Ogden Climbing Festival. Though each climber was hoping to win, all of the climbers were cheering each other on, wanting each other to climb their best.
Having an award like the Piolet d'Or is not about pointing out those that don't win; it's about celebrating those that have succeeded in pushing the sport the most. There's no shame in climbing an incredible route, being nominated for a Piolet d'Or, and then not winning the ultimate prize.
But, when you start handing awards out to everybody, it devalues the award. Even if everybody is worthy of winning the award, the award is not worth as much to the sport or those that are in the running. The "everybody wins"/participation trophy approach is the quickest way to make the award irrelevant and encourage mediocrity or at least stop encouraging excellence.
Reward the excellence of the best climbs by nominating them for the Piolet d'Or, but then recognize the very best of these top climbs with the actual award. It encourages future climbers to push their personal limits and the limits of the sport.
I hope that the participation trophy approach is a one-time thing and doesn't become the standard. If so, I imagine somebody else with some other award will eventually step up to recognize the best climb, it will become the most sought after award, and people will start to forget about the Piolet d'Or.
Monday, March 4, 2013
Metamucil Therapy
This is a re-post from February 9, 2012. I had forgotten about it until I ran into somebody that had read the blog and mentioned he enjoyed this article, and that he had tried it out with some success. I posted it back when about seven people (all of which are family members) read my blog. I am up to about 12 people now, so for the five that haven't read this article, here you go. Maybe it can enhance your future outdoor experiences.

Metamucil Therapy
Without going into too much detail about my own digestive system, I want to share something that makes my multi-day outdoor outings much more enjoyable. One of the many great outdoor innovations (debatable) of our time is the freeze-dried, just-add-boiling water backpacking food. It is light, easy to prepare, pretty tasty, etc. But like most food you find today, one thing freeze-dried food lacks is fiber. Most people get the majority of their fiber from vegetables and some fresh fruits. In the mountains, however, it is difficult to take fresh fruits and vegetables. Vegetables generally don't have enough calories to be worth their weight and bulk to carry. Fruits are usually heavy and sometimes hard to keep from spoiling or getting smashed. Combine this with the fact that many foods that are great for the mountains, especially during winter (proteins and fats, like cheese, meats, etc), often have the opposite effect of the fruits and veggies, and you have a recipe for, at the least, discomfort, and at the most, digestive disaster (which isn't pretty on multiple levels).
Last year, while camping at Ingraham Flats on Mt. Rainier, our group was sharing a camping area with a guided group of about 15 people. Of course, while camping on a glacier, there aren't too many places (one, to be exact) to go to do your business. That one place is right out in front of everybody. So, when you walk over to, well, you know, you simply inform everybody that you're dropping your pants and everybody else turns around (hopefully). I don't know about you, but I enjoy my privacy while #2ing. So, I hope, when I get over to take care of business, it goes quick and clean and nobody sees anything. Well, imagine (figure of speech, probably not worth really imagining) you just hiked up to Ingraham Flats (or 14 camp, or any other glacier with other people), you have to go to the bathroom, you've eaten a lot of cheese and other calorie-rich, fiber-poor foods, you haven't been able to eat many fruits or vegetables, and there are people around. In your head you're praying that the whole process takes less than 30 seconds, but you know that's not likely. Bad situation. You'd probably almost rather hike back down to Camp Muir to use the solar toilets.
Ok, so when you're in the mountains and not on a glacier and it's time to find some privacy, maybe it's not as big of a deal to keep it under 30 seconds, or a minute. It is, however, much more enjoyable when the process is clean and comfortable. It makes hiking more comfortable, cleaning up leftover bathroom supplies easier, etc. A nice, comfortable two-zy can be quite an enjoyable process, especially if the view is good. It's a nice change from staring at the wall of a bathroom.

A poo with a view, Avalanche Canyon, Tetons
Digestive health is simply a small detail that nobody talks about that can make a trip more or much less enjoyable.
In order to minimize my bad outdoor bathroom experiences and take full advantage of potential good experiences (i.e. good views), I do what I call, "Metamucil Therapy." The idea is simple. About a week before the trip, start taking metamucil. Don't go overboard, but be consistent. Make sure your digestive system is working well. Then, when you get into the mountains, keep taking it. You may need to up the dosage a little to get the same desired effect as you did at home with a healthier diet. Metamucil is not like most other laxatives on the market. It doesn't cause diarrhea (at least it shouldn't). It's bulk-forming and softening. That's why I use it instead of other fiber supplements while in the mountains. And it tastes better than a lot of other fiber options, in my opinion.
It's a good idea to try it out before your trip. It may take some time for your body to get used to it and there's a small chance that it just won't work well for you. But if it does work, what a great outdoor skill to improve. I use this system on pretty much every trip I go on that is over more than about 2 days. It has allowed for consistent sub-30 second bm's, which is key when other people are around and there's no escape to seclusion.
Saturday, March 2, 2013
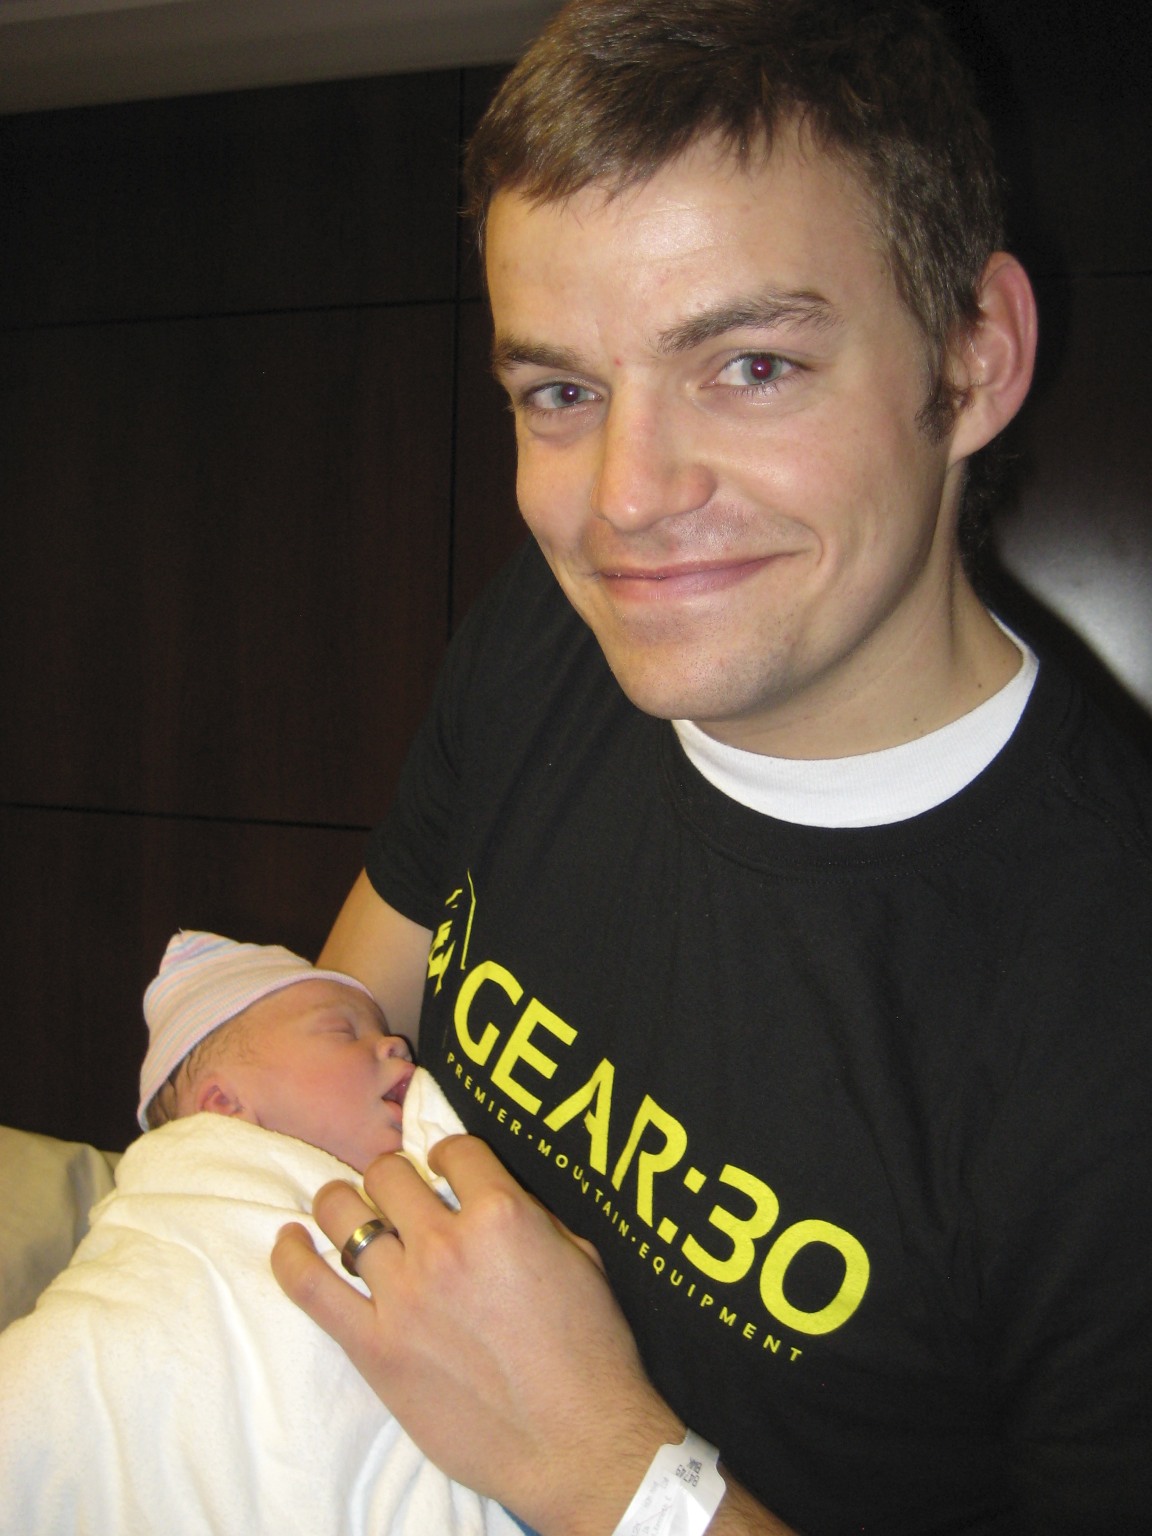
My Most Recent and Most Exciting Adventure
I got a phone call from my wife yesterday as she was driving back from Salt Lake City, letting me know she was having contractions and was headed to the hospital. Three hours later, we had a new baby boy!
I don't care what other people say or think - fatherhood and children are 1 million times better than any mountain adventure I've ever had, and this is only day 1.
Lincoln Mac Reynolds is his name, we think. He was 6lb 10oz, 19.5 inches long. Born at 36 weeks.
Here are a few pictures:


I don't care what other people say or think - fatherhood and children are 1 million times better than any mountain adventure I've ever had, and this is only day 1.
Lincoln Mac Reynolds is his name, we think. He was 6lb 10oz, 19.5 inches long. Born at 36 weeks.
Here are a few pictures:
Proud New Papa
Happy New Mama.
Healthy New Baby
Everybody racing to be the first on Facebook with the announcement (this was not staged until I was about to take a picture and then the last person but up their phone).
Lincoln Mac Reynolds. He was breech and had to be delivered C-Section. His head was a little flat on one side but has since rounded out nicely.
Subscribe to:
Posts (Atom)