Friday, April 13, 2012

Stephenson's Warmlite 3R Tent Review

The Stephenson's Warmlite 3R


There are pieces of gear that I buy without too much thought and consideration, and then there are pieces that I research for years (literally) before getting a hold of one.  The former is usually fairly inexpensive.  This review is about one of the latter; I definitely put a lot of thought and research into this one and it is definitely expensive.  I have been researching these tents for years and years, hoping one day to buy one but never knowing if I would have the patience to save up enough money to actually buy one.  They aren't cheap!

To help you judge the level of my bias, let me just say that I have been in lust with these tents for a long time, never actually getting my hands on one until this spring.  This prejudice can be a bad thing for two reasons.  First of all, I could have been setting myself up for disappointment.  On occasion, I'll be so excited for a new piece of gear that it is almost impossible for it to live up to my expectations.  The second problem, my biased views can cause me to only see the good that I want to see and ignore the bad (a type of denial, I guess).

Well, thanks to a very generous early graduation present from some family members, a Stephenson's Warmlite 3R unexpectedly came into my life.  I was able to use it on the last trip to the Cirque of the Towers, which ended up being a pretty good first test.

So, here are a few of the stats and features:
  • 3-person, 4-season, 1.5 wall tent
  • Not freestanding; goes up with four stakes, eight if you expect really bad winds
  • 4lb 3oz (which includes windows on each side of the tent and a big door on one end); their advertised weight is 3lb 12oz, but that is not including the windows (which add 5oz)
  • Double wall between the poles (reduces condensation and adds warmth), single wall on the ends (reduces weight)
  • Made of high tenacity sil-nylon; the internal layer between the poles is an aluminum-coated nylon fabric
  • 7187-T6 aluminum, 5/8" diameter pre-curved poles.  These poles are so lightweight that they feel like they'd easily break, but in 60+ winds they didn't even flinch.
  • Easily room for 3 AND gear
  • No vestibule (assume the end cones are vestibules with floors)
  • Two doors, one on each end of the tent; one big door that zips up both sides, and a second smaller door than zips on one side

Pictures and Explanations


For the size, this may be the lightest 4-season tent available

The backside of a 3R.  I have read as many reviews on this tent as I could find, and the one (and often only) problem that seemed to come up was condensation.  SW claims to control condensation problems with their venting system, with one vent below the door flap and one vent at the top of the door on each side of the tent.  From my experience, this venting system works quite well, assuming you don't block the lower vent with gear.

This vent is below the door flap.  The bottom zipper is about six inches off the ground, and the mesh is more difficult to see than the nylon.  Because of this, it's easy to trip over the doorway.

A look at the door vents from the inside.  The flap on the door can velcro down over the vent, and the upper vents can zip shut.  Every night but one that I have slept in this tent it has been pretty windy, so airflow through the tent was pretty good and condensation wasn't a problem.  There was a little bit of condensation on the single-wall ends during the one calm night, but it was significantly less condensation than a cold night in a BD Firstlight, for example.

There was no condensation on the double-wall section between the poles.  The sides of this tent also have two windows.  These windows add 5oz to the total weight and apparently have no effect on the strength of the tent when the windows are shut.  There are four pockets, one on each side of each window.  Each pocket is a bit bigger than a 1-liter nalgene. 
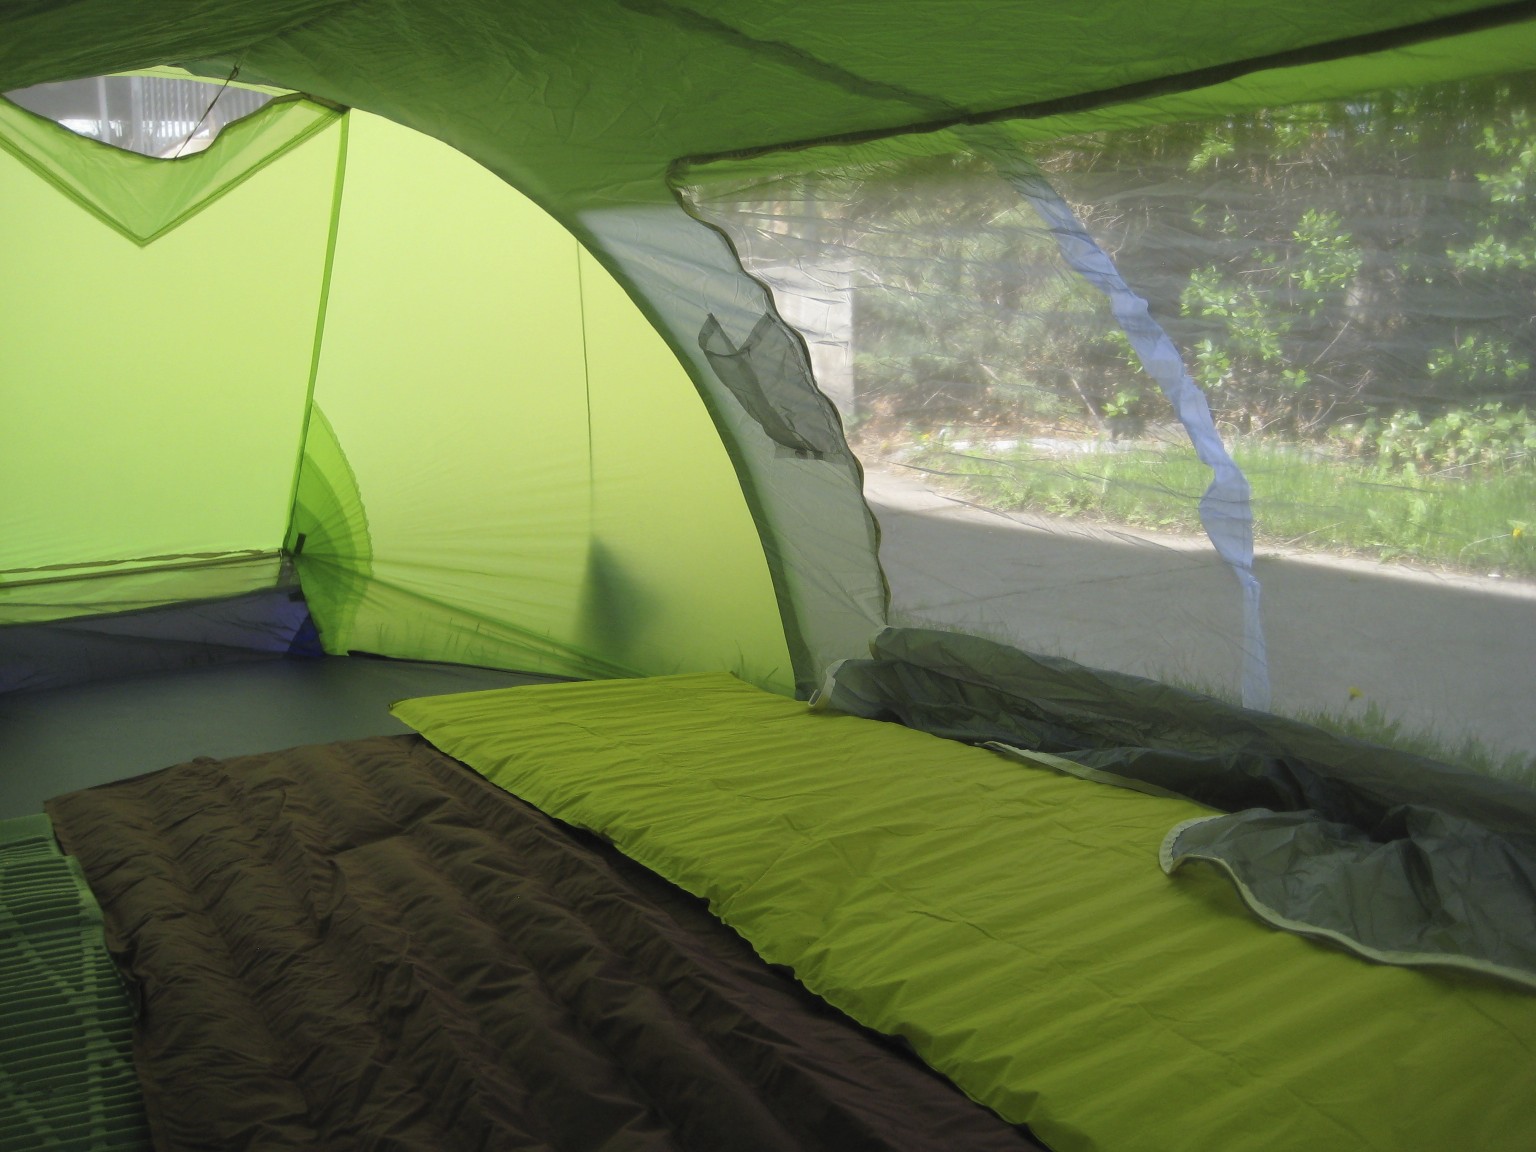
The interior with the windows down.  The white sleeve in the middle of the window is a third pole sleeve.  The additional pole aids in heavy winds or snow loads.  The tent comes with two poles; the third pole is an additional $65.  

The external window flap.


This tent is big for three.  You can sleep three side by side with quite a bit of room on both ends for gear.  Each of these pads is 20" wide and 72" long.  With some creativity, you could sleep four.

There is approximately this much space on both ends for gear.

This is the back door.  There is a zipper on the bottom and right side only.  You can add a zipper up the left side for an additional $15.

The stake out points are interesting.  There is a camlock to adjust the length of the webbing and tighten the pitch of the tent.  It seems that the camlock is on backward; it's a little difficult to adjust.  It would be easier if the cam lock was oriented down the webbing so that you could pull the webbing down to tighten, like a 3-to-1pulley system.  Instead the cam lock is oriented facing up the webbing, so it's a little more difficult to tighten. 

The poles of this tent are an extremely light, very thin-walled 7187 T-6 aluminum.  They are pre-curved and are pretty stiff.  SW claims that 80% of the strength of flex-to-shape aluminum poles (the kind that are used in almost every other tent on the market) is used when the poles are bent.  Their poles are stiff and pre-curved so that no strength is lost.  SW claims that their poles can resist 20 times more force than regular poles.  I'm not sure if those numbers are true or not, but I do know that other tents I have used are quite deformed by the wind at 60mph, unless they use a lot of poles (heavy) and/or are well guyed out.  This tent doesn't use guy lines and only uses two poles.  With that said, in 60mph winds this tent didn't flinch.  The poles didn't bend, not even the slightest bit.  The tent just flapped a bit, but that was it.  SW does give some pretty detailed instructions on how to care for the poles, because as strong as they are in the wind, they are not very durable.

This poles are super light and thin.  Extra care should be taken so they aren't damaged.
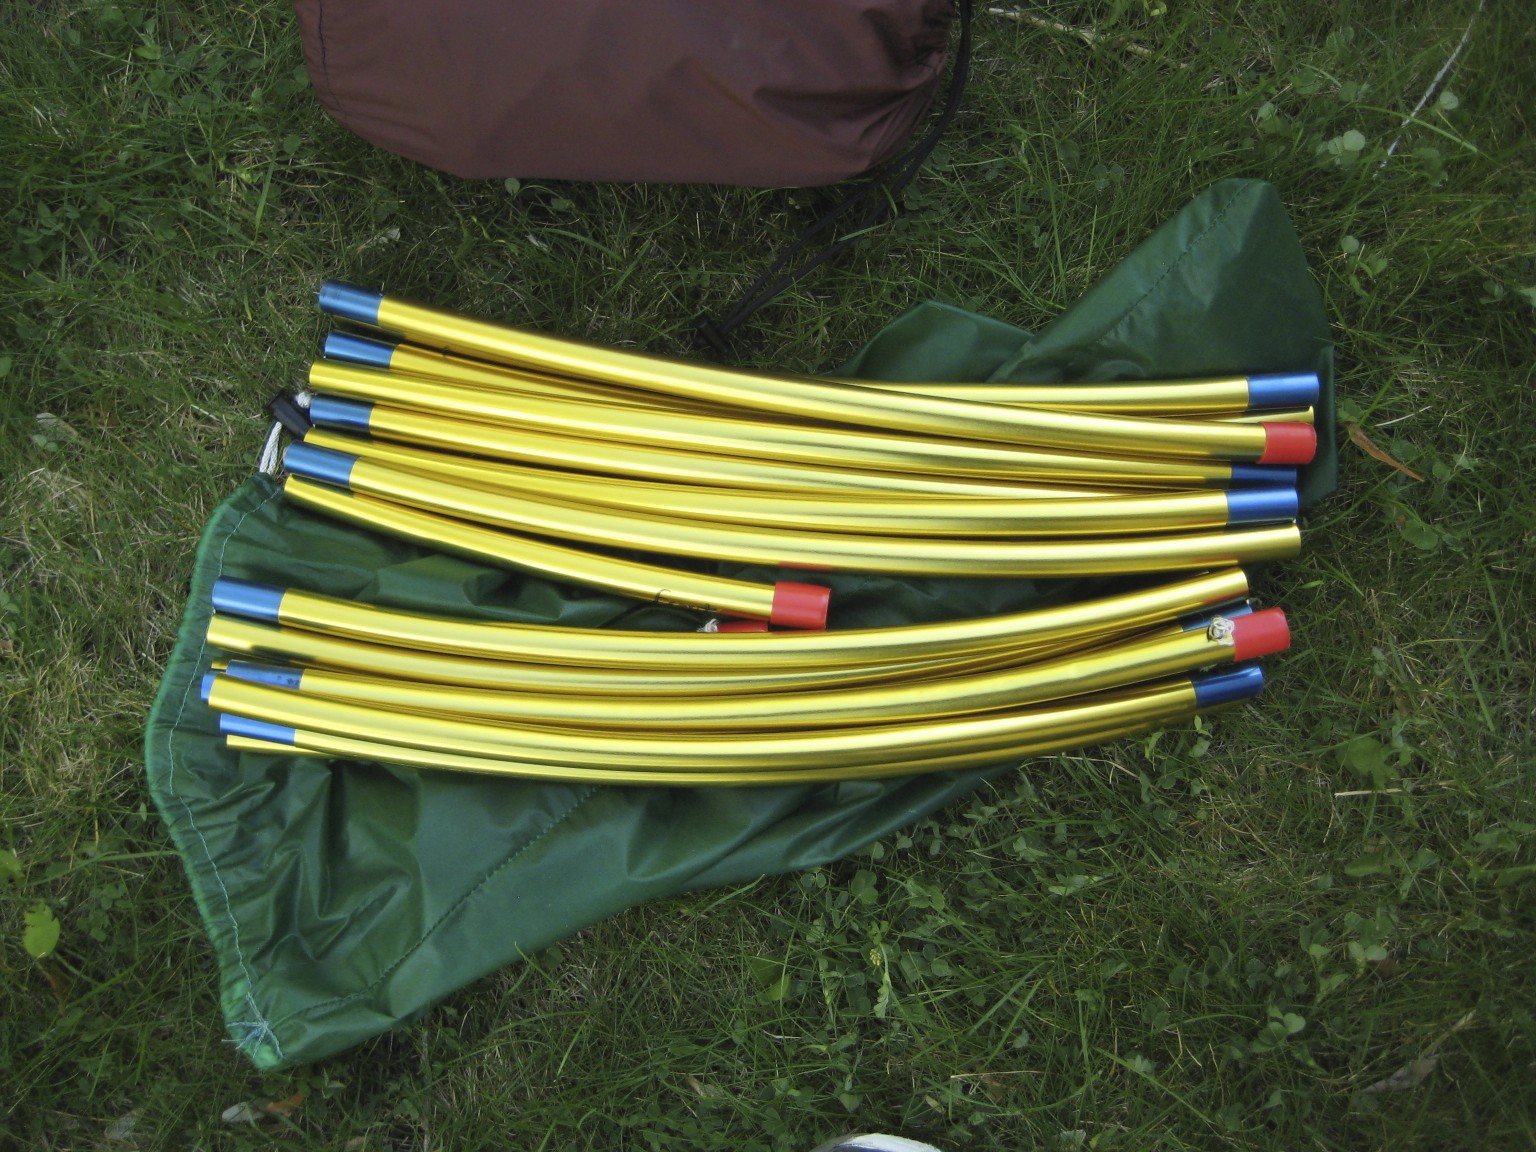
The curve in the poles is hardly noticeable when they're collapsed.  I roll the poles up in the tent to help protect them, but I'm still paranoid I may damage them somewhere along the way.  So far so good.

This tent is about 20"x8" packed up.  It easily packs into its stuff sack.  It weighs 4lb 3oz. 


 Here's a little video of the 3R in the wind.  Gusts during the trip were, at times, around 60mph, but gusts in the video were probably closer to 40mph.  The tent looked about the same at 60mph as at 40mph.

My Experience

This tent is awesome.  This tent is really easy to set up.  With a little practice, it takes about 2 minutes to set up with two people.  It's even pretty easy to set up in the wind.  

The tent is quite roomy, even for three people and winter gear.  When the tent is first pitched, both the inner and outer layers are taut.  After a while, the inner layer hangs loose a little.  It makes the tent feel as if there isn't as much headroom, even though you can easily push your head up through the inner layer to the outer.  

The craftsmanship is great from what I can tell, though it may not seem like it at first glance.  All of the material is either cut with a laser or hot knife, so the edges shouldn't fray, but they are all exposed.  Most companies bind the edges to make them look prettier, though the edges may fray within the binding.    The seams are pretty straight, though not perfect.  SW seems to value function over form.  I'm cool with that.  SW doesn't seal the seams, but they give you silicone seam sealer so that you can do it yourself.  They say it takes about an hour.  I say four. 

I'm not sure where this should fit in, so I'll put it here:
I have read horror stories about SW's customer service, but I have also read many positive comments.  What I understand is the owner doesn't like to feel like he's being taken advantage of.  So, if he suspects you damaged the tent, plan on paying for the repair.  Jack Stephenson is the founder of SW.  His son, Bill, is the current owner of the company.  My family said that Bill was helpful and friendly over the phone when they talked to him while purchasing this tent, but that's the only contact we've had with this company.  The fact is, the tents are good.  Take care of the tent according to the supplied instructions (and there are a lot of them) and it should last a long time.  Don't follow the instructions and that may mean expensive repairs. 

The Gripes

It's still incredible to me that SW has made a true three-person, four-season tent that can handle 90+mph wind (according to SW) for four pounds.  Incredible!  It can handle 160+mph with wind stabilizer straps (again, according to SW; the straps are an additional $30). With that said, it doesn't come without its down sides.

The durability of the tent is a little questionable, considering the lightness of the materials.  SW suggests using a ground cloth to increase the durability of the floor, but that adds weight, of course.  More worrisome to me than the durability of the material is the durability of the poles.  Time will tell how durable the tent is.  I think, with extra care, the tent should last for years and years.  

Some sort of vestibule would be nice.  The tent is plenty large for storing gear, but a floorless vestibule would be nice for cooking in bad weather.  

The only other gripe is the price, but there is no other tent on the market, that I know of, that offers this much at such a light weight.  For that, I think the price is reasonable. 


The Verdict

I really like this tent, if that's not already clear.  I think the design is brilliant.  The price is high (about $680), but compared to other similar tents, it's pretty affordable.  I'd give it 5 out of 5 stars.

For more information on Stephenson's Warmlite tents, you can check out their website


Sunday, April 8, 2012

A Fairly Successful Trip to the Cirque of the Towers

I just got back from a fairly successful trip to the Cirque of the Towers in the Wind Rivers, Wyoming.  The original plan was to climb a couple new ice and mixed lines that we had noticed a few years ago.  These lines have caused many a sleepless night.  One of them looked to be about 1000 ft of WI 4-5 M5 or so, the other looked significantly harder.  Unfortunately, after 15 miles of snowmobiling to the trailhead and 10 miles of skinning with heavy packs, we found that neither of the lines are in.  In fact, there was hardly any ice to be found in the cirque.

It took a few hours for the bad news to sink in before we were making alternative plans.  We decided to climb Pingora the next day via the South Buttress Route (left crack of k-crack variation; 4 pitches, 5.8, 500ft).  We only brought rigid boots, so the crux pitch that goes from a hand to finger crack was a little saucy.  It was a really fun route, though, and the weather was very nice.

On the way down from the climb, Phil noticed an ice line on a smaller mountain (not sure of the name; it's the lump of a peak just below overhanging tower in the picture below)


This ice line became our objective for the next day.  It didn't look too difficult or very big, but it was, as far as we could find, the only climbable ice in the whole cirque.

The next morning we woke up to very strong winds (approximately 60mph gusts) and cold temperatures. It was very difficult to want to get out of our sleeping bags.  When we finally got ready and skinned across the cirque to our new line, the wind had calmed a bit and the sun would occasionally peek out from the clouds.  We thought the ice section of the climb looked about 200ft tall, but when we got up to it, it was only about 115ft or so.  

Because Phil had led the majority of the rock pitches the previous day, I got the honors to lead this pitch.  The ice was pretty thin, only taking stubbies in most places.  The ice started out with about 20ft of lower-angle steps until it steepened up to about WI4 difficulty for about 100ft.  The climb narrowed near the top and required some exciting, slightly trickier footwork to climb up and around a final rock bulge to a decent belay.

The second pitch was a 200ft gully of 65-degree unconsolidated snow.  We decided to stay roped and protect it with rock gear just in case the snow slid.  The first 15 feet was 10 minutes of wallowing before I wisened up and decided to use the rock to make progress.  There were nice cracks in the rock all the way up the gully, allowing for rock gear placements every 40 feet or so.  I climbed about half on the rock and half on the snow.  Every time I would commit again to the snow, my progress stopped.  I finally reached the end of the gully and my rope and found a good rock to sit on for a hip belay.  Phil and I scrambled another 200 vertical feet to the summit and decided that was probably the only first ascent we would have in the cirque this year.  We then headed back to our skis and skied back to camp.

The trip was totally worth the effort (I say that now that I am home, rested, and have eaten a good meal), but there was a lot of effort involved.  To approach the trailhead involved two snowmobiles and about 15 miles of riding.  This wouldn't have been difficult but we had many problems with the sled we were pulling and we occasionally got one of the snowmobiles stuck (Neither Phil nor I have much experience with snowmobiles).

Upon reaching the trailhead, we put our skis on and started the 10-mile slog into the cirque.  My pack was about 60 pounds (I brought way too much food) and Phil's pack was about 20 pounds and was pulling a 50ish pound sled with most of the climbing and group gear.  It was a long, slow hike full of blisters and sled frustrations.

Good rock climbing and the discovery of this small ice line saved the trip for us.  We are still crossing our fingers that the other ice lines will form on another, wetter year, but it is a long way to go just to be disappointed.  Who knows, maybe next year.

I'll post pictures and videos of the trip soon.

Friday, March 30, 2012

I'll be gone for a week

Phil and I have been planning a climbing trip for the last six months or so, and the time has finally arrived.     So, I'll be in the mountains until next Saturday and won't be able to post.  Hopefully we'll return with some good pictures.

See you next Saturday.

Wednesday, March 28, 2012

The Alpine BOMB for the MSR Reactor

Starved for adventure (I blame school for that one) and sleep deprived (again, school), Phil and I finished our last day of class for the semester and headed into the Uinta Mountains of Utah to try to climb a frozen waterfall and a frozen pile of choss, which is called Red Castle.  Red Castle is one of the most popular places in the Uintas for backpacking, but rarely does anybody venture in that area during the winter.  The main reason for this is that the road is only plowed to about 8 miles from the trailhead and then there is an additional 12 miles of hiking from the trailhead to Red Castle.  20 miles of skinning or snowshoeing is usually enough to keep sane people away.  Most climbers don't even go into that area because the only waterfall up there is about 70 feet tall and Red Castle is literally a pile of rocks held VERY LOOSELY together by mud.

Red Castle during the summer

Phil and I have never been accused of being very smart or sane, so we decided to give it a try.  It took two  very long days to hike into Red Castle pulling sleds.  Once in there, we decided to climb the waterfall (about WI4+) a few times but judged that attempting to climb Red Castle, being so far away from anything, would be dumb.  (A side note: Haunted by this experience, we went back during the summer to attempt a climb of one of the west faces of Red Castle.  We ended up bailing after about two pitches because the rock quality was so poor.  It was more like trying to climb hardened mud than actual rock)

This, believe it or not, is simply a long introduction to how I came to hate canister stoves for winter climbing.  On day three of our trip, I was trying to heat up some water with my Jetboil so that I could have a warm drink and dinner.  This stove normally takes about 3 minutes to boil 2 cups of water during the summer.  On this trip, it took about 25 minutes to melt snow and bring the water to a boil, and that was while swapping out warm canisters from my belay jacket.  I took me almost two hours to eat dinner, make some hot chocolate, and melt enough snow for the next day.  I was so frustrated!

I went home, ordered a Reactor, and pawned my Jetboil off to my brother (He mostly does summer stuff anyway).  I have found the Reactor to be far superior to the Jetboil when it comes to cold weather use, but it's still not perfect.  Though much more efficient than any other canister stove I know of, the canister still gets really cold and the stove doesn't work nearly as well as it could.

A friend of mine is headed to Denali in about a month.  To get ready for this trip, he and his climbing partner have been spending a lot of time this winter in the Tetons above 10k feet.  My friend told me that he was worried about his stove situation because his reactor wasn't working all that well in super cold conditions (-10 degrees or colder).  I told him I would try to help him come up with a solution.

Here's what I came up with:
After four hours of failure, this took about two minutes to make.

I will be making a closed-cell foam cozy for the canister.  The current cozy is just part of an old wool sock.  The sock isn't nearly as efficient as closed-cell foam and I am afraid that it could catch fire or melt if the copper gets too hot.


My original designs were much more complicated and involved copper tubing being pounded flat, then wrapping that around the pot, and attaching that to the canister.  Because of the way the Reactor is designed, I thought it would be too difficult to get the copper tubing under the pot and against the actual burner.  Stealing heat from the pot seemed like the only way.

Four hours of failure later, I pounded some copper tubing flat, bent it into a shape that would hug the silhouette of the stove, and stuck the pot on the stove.  Though the pot doesn't sit perfectly flat, it is hardly noticeable.  The copper piece now transfers heat from the stove to the canister to keep the canister warm.  I haven't tested this extensively, but so far so good.  The copper definitely transfers heat efficiently, potentially too efficiently.  The scary thing about Alpine BOMBs is that if the canister heats up too much, it will explode.  I will be testing this tool a bit more extensively next week.

WARNING!  PLEASE UNDERSTAND, THERE IS NOT A SINGLE STOVE MANUFACTURER IN THE WORLD THAT WOULD ENCOURAGE THIS.  THIS IS POTENTIALLY A VERY DANGEROUS TOOL THAT SHOULD ONLY BE USED WITH EXTREME CAUTION AND SUPERVISION.  


As I test this system, I am constantly next to the stove, checking the canister to ensure that it doesn't get too warm.  This system was designed only to be used in extreme cold.

Also, because there were a couple sharp corners on the copper that I didn't sand down, I accidentally put a hole in my neoair mattress.  So, sand off the sharp edges.

I originally saw this idea on http://www.ademiller.com/blogs/climbing/2005/12/gear-the-alpine-bomb.html.  He gave a thorough explanation of why canister stoves just don't work well in the cold.  The article is worth reading.  His Alpine BOMB looks like this:


I hope to have a little more information about the performance of the stove with and without the copper in a couple weeks.

05/18/2012 - It has been almost two months since I made the Reactor BOMB, but I've only had one chance to use it in cold weather.  This past week I used it on Mt. Rainier in about 25 degree F weather.  In the same weather without the copper heat exchanger, the canister would get very cold and the efficiency would drop immensely.  With one copper heat exchanger at about 25 degrees, the canister wouldn't get cold or hot and the efficiency would stay about normal.  It boiled 1.5 liters of ice cold water in about 3.5 minutes in 25 degree weather.  This is about the same amount of time that it takes during the summer.
  
I'm sure that another copper heat exchanger would be necessary to keep the canister warm if the temperatures were significantly colder, but one worked fine for the temperatures I used.  

The stove gets so hot that the copper turns black and becomes weaker.  I don't think the copper heat exchanger is going to be a very durable and with extended use it will eventually break.  Luckily, with practice, these exchangers only take about 5 or 10 minutes to make and don't cost very much.     

Tuesday, March 27, 2012

The New Wild Things Belay Jacket vs Some Others (How's that for specifics?)

Ever since I was 16 and I laid my hands on a Wild Things backpack for the first time, I have been a huge fan.  I bought a few pieces of Wild Things clothing as well and they have been with me just about everywhere.  I was just about to buy a Wild Things belay jacket when they stopped making climbing gear and started only making tactical clothing and packs for the military.

A few years later and Wild Things climbing clothing and packs are back!  I wasn't sure what kind of quality and design to expect from them considering their hiatus and change in ownership (their founder is still on their board and still designs much of their stuff), but so far everything is looking like the old gear that I was in love with.

One jacket in particular that has my eye is the Wild Things Belay Jacket.  Here are some specs:
  • 100% 70 denier nylon, Epic by Nextec shell
  • 6 oz. PrimaLoft® Sport synthetic insulation
  • Erictex, 100 poly, 30d lining
  • Adjustable, helmet compatible hood
  • Two-way center front zipper
  • Interior mesh drying pocket
  • Interior zippered pocket
  • Single-pull adjustable hem
  • Weight: 2 lbs 4 oz
  • Made in U.S.A.

One internal mesh pocket

One internal zippered pocket

EPIC by Nextec® Shell. From Wild Things:  No laminates. No coatings. The protection is inside the 100% nylon 70 denier face fabric, encapsulating the actual fibers for weatherproof, breathable performance. The result? A highly water/wind resistant, abrasion resistant shell that breaths


 Helmet compatible hood. From Wild Things:  The adjustable hood fits tightly over a climbing helmet and offers great visibility and mobility. Elastic along the back of the hood keeps the fit snug while you move your head, so the hood stays put.
These photos are from www.wildthingsgear.com


Everything looks great to me except for the weight.  I imagine that weight is for a medium.  A little heavy.  In comparison to some other well-known belay jackets, this is about 12oz heavier than the Arc'teryx Dually Belay (according to their factory listed weights, which may vary significantly), 10oz heavier than the Patagonia Das and the Mec Tango, and 7oz heavier than the Rab Photon Belay Jacket.

As far as warmth, I would guess that they are all fairly comparable in warmth considering the type of insulation used and how much of it is in the jacket.  The Das is the only jacket mentioned that is sewn all the way through.  For that reason I would guess that the Das is slightly less warm and less water resistant.  I know that a lot of people love the Das.  Please don't send hate mail.  The Wild Things belay uses Primaloft Sport instead of Primaloft One, which is not quite as efficient though a little more durable over time.  The Rab uses Primaloft Eco, which is a step down in function as well.

The Dually is most likely the most weather resistant and potentially the warmest of all these mentioned because Arc'teryx's Dually insulation, Thermatek (essentially DWR-treated Primaloft), will not soak up water and it is laminated to the shell fabric, not stitched, which means less compression where the insulation would normally be stitched.  More loft = More Warmth.

The Wild Things uses Epic Shell fabric, which is more weather resistant than the shells of the other jackets (from my experience).  Therefore, I would guess that the Wild Things Belay Jacket would be the 2nd most weather-resistant of the group.

At $250, it looks to be an absolute steal for what the jacket offers (compared to the $500 price tag of the Dually).  As far as its heavy weight is concerned, my bet is that it's not much heavier than the other jackets considered.  Dane at Cold Thistle compared weights of many of these jackets (and a bunch of others) with his own scale and found them all to be quite a bit heavier than their posted weights.  To be fair, he was measuring, in most cases, XLs and most companies advertise the weights of Mediums.  Comparing materials, features, etc, the Wild Thing jacket should come in pretty close to the others.  If it is slightly heavier, that means you are getting a little more weather protection and abrasion resistance from the shell.

As far as their other products are concerned, everything at Wild Things is starting to look about like it did before they left, which is a great thing!

For more information on Wild Things Gear, check out http://www.wildthingsgear.com/

For a good, side-by-side comparison of some popular Belay Jackets, check out Cold Thistle here:

It's fun to do a little rock climbing again

Ogden weather is fickle.  I can't figure it out.  Saturday Phil and I went rock climbing  and it was 70 degrees and sunny.  Today it snowed.  Tomorrow it's supposed to be almost 70 again.  I'm not sure whether to pray for snow (which has been in extremely short supply this winter) or embrace the sun.  Either way, the climbing on Saturday was really fun!

We headed up Ogden Canyon to Utah Wall.  There's a route there, Air Time (5.10c), that is really fun.  It is slightly overhung in places and follows an arete that eventually hangs out over about 100ft of air (hence the name).  I think that this route was originally climbed by one of the Lowes (Greg or Jeff), but I'm not 100% sure.  The fact is, the majority of the best routes in Ogden were first climbed by the Lowes, so it's usually pretty safe to give them credit for it.

Because we wanted to get pictures and there were only two of us, we decided to fix a couple lines and rope solo.

Anyway, here are some pictures:
The lower part of the route is slightly overhung but has nice, large holds.  Really fun section!


The middle section is the crux.  The moves go from a mediocre undercling with the right hand with poor feet to a thin but decent finger crack, to a small crimp, to a decent pinch, to a perfect hand sized crack that pulls the roof.  It's a really fun sequence!  At the top of this picture is a bulge.  You pull the bulge into a small pod and at the back of the pod is where the hand crack roof starts.

The finger crack is actually where the nut is placed.  I got a little off route right here and had to climb back down to get on the correct moves.


If you tuck your shoulder in there is a no-hands rest before the roof


Perfect hand-sized roof.  Careful, this section eats #2 and #3 camalots, especially if you're tired and a little worried about the exposure.


After the roof there is a fairly easy, albeit awkward traverse with about 100 feet of air below your feet.


If you live in Ogden and haven't tried this route, or you are visiting Ogden and want to try an exciting, 5.10 trad route, this is a great option!